Quick Start
A Device Handler is a representation of a physical device in the PEA HiVE platform. It is responsible for communicating between the actual device and the PEA HiVE platform.
Alternately, a Device Handler can also be associated with a Virtual Device when a physical device is not yet available. This section will walk you through creating your first custom Device Handler and testing it with a Virtual Device.
Warning
Before you proceed, ensure that you are on the correct Location on IDE. Follow the prerequisites described in Prerequisites.
If you are new to PEA HiVE development, consider starting with the Getting Started material.
Create a new Device Handler
From IDE click on the My Device Handlers link on the top menu. Here you will see all your Device Handlers, if you have any.

Create a new Device Handler by clicking on the +Create New Device Handler button in the upper-right of the page.
You will see a form for creating a new Device Handler. Note the tabs at the top of the form, showing different options for creating a new Device Handler:

Select the From Template tab.
We are going to create a new Device Handler from the Dimmer Switch template. Click on the Dimmer Switch in the menu on the left.

You will now see the Dimmer Switch Device Handler code on the right.
Take a minute to look at the code and its structure. Don’t worry about the details yet - for now, just take note of the anatomy of the Device Handler:

Next, make a few changes to this code to make it yours.
In the definition method, change the name from “Dimmer Switch” to something like “My Dimmer Switch”, the namespace to your github user account (or you can leave it blank), and the author to your name.
Click the Create button below the editor, and then click Publish and For Me on the next screen.

Create a Virtual Device
Next, we will create a Virtual Device and associate it with the Device Handler we just created above.
From the top menu of the IDE, click on the My Devices.

Click on +New Device on the top-right. This will take you to Create Device page.

Follow below steps to fill the above Create Device form:
- Name
- Your Virtual Device, preferably something that’s indicative of the type of the device, such as “Virtual Dimmer Switch”.
- Label
- Optional, but you can have something like “virtual-dimmer-switch”.
- Zigbee Id
- Can be blank.
- Device Network Id
- Should be a unique ID that identifies your Virtual Device. Make sure this ID doesn’t conflict with any other device Ids. Put in “VIRTDIMMERS01”.
- Type
- Pulldown menu lists available Device Handlers. Note that all your custom Device Handlers are listed at the bottom of the pulldown list. Scroll down the list and select the customer Device Handler that you created above.
- Version
- Option should be Published.
- Location
- Must be your Hub Location.
- Hub
- Your Hub name associated with the above Location.
- Group
- Not selectable.
Click Create.
You will see virtual-dimmer-switch device appear instantly in your PEA HiVE mobile app, in the Things screen of the “My Home” view.

Test your Device Handler with Virtual Device
With the Virtual Dimmer you just created you can test your Device Handler. From your PEA HiVE mobile app, tap on the OFF tile of virtual-dimmer-switch to turn it ON.
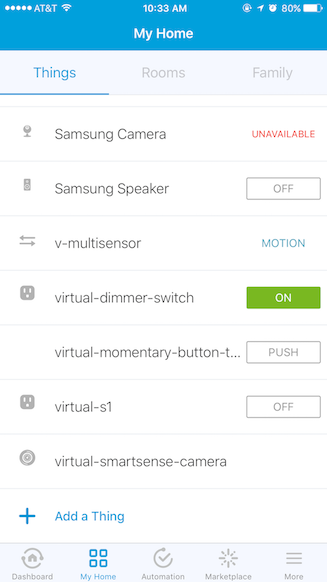
Next, tap on the virtual-dimmer-switch to open the detail view and test the tiles.

Note
While the Simulator is useful and necessary for testing how the Device Handler handles incoming messages, we recommended that you test on the mobile app with Virtual Devices wherever possible.
Next steps
Now that you have created and installed your first Device Handler with a Virtual Device, use the rest of this guide to learn more.